


Recently, we have learned to create and insert AdSense Ad code into Blogger Template in a very precise manner. After reading that tutorial one reader asked me to add a Gadget inside the blogger blog header for the purpose of displaying AdSense Ads.
That was very interesting for me as because there is no any option in default blogger template or even many customized blogger premium/free templates available on internet to add a new Gadget inside the header slot rather you can’t even move the header widget from its default place.
Most of blogger wants to insert their AdSense codes or any direct advertiser’s Ad banner into the blog header because this space is above the fold, more eye catching and gets maximum number of impressions.
Therefore, today we will learn the tricks to add a new widget next to the Blogger header just besides your blog logo or title or description for the purpose of either displaying AdSense Ads or for adding any other third party HTML/JavaScript codes.
How to Divide Blogger Blog Header into Two Parts
Before we start editing blogger template, I strongly recommend you to backup your blog template for future reference on the safe side. Now, follow the following steps very carefully so that you can easily divide your BlogSpot blog header into two parts in first attempt.

Step-1 (Default Header Layout):
Login into your blogger account and visit the Layout section of your blog to see the header position whether it is single or has already been divided. Here is screenshot for the default blogger blog header.

If your blog contains only one column in header section as above, then follow the next steps to divided it into two parts.
Step-2 (Template Editor):
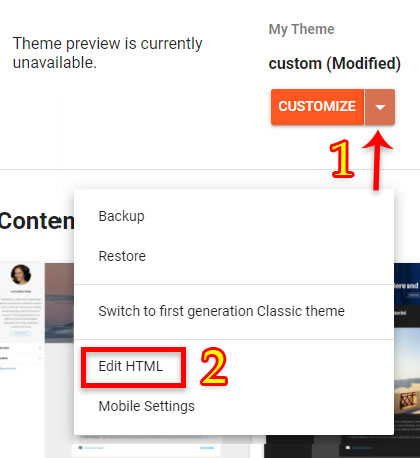
Go to the Template section of your blog and click on Edit HTML text button next to the Customize button. See the screenshot for template Edit HTML button.
Step-3 (Edit Template):
Click on Jump to widget from the top drop down menu and select Header1 as shown in this screenshot.

Step-4 (Delete Default Header Section):
You will see the following (Screenshot) codes which represents default blogger blog header section.

Now, delete all these codes so that the older header section will be deleted.
Step-5 (Insert New Header Section):
Copy and paste these HTML codes in place of old header section deleted codes as shown in this screenshot.

<!-- SWT Header Section START --><div class='region-inner swt-header-inner'>
<b:section class='header-left' id='header-left' maxwidgets='1' name='Header-Left' showaddelement='yes'/>
<b:section class='header-right' id='header-right' maxwidgets='1' name='Header-Right' showaddelement='yes'/>
</div><!-- HELP: http://www.superwebtricks.com/display-adsense-in-blog-header -->
Don’t delete the HELP URL address from the last line of above code as it may help you in future for any updated tutorial and code upgradation.
Step-6 (CSS for New Header Section):
Now, press Ctrl + F for search the ]]></b:skin> and paste the following CSS codes above/before it.
.swt-header-inner { /* HELP: http://www.superwebtricks.com/?p=570 */
width: 100%; display: flex;
}
.header-left {
width:50%;
margin:0;
padding: 0;
float:left;
overflow:hidden;
}
.header-right {
width:50%;
margin:0;
padding: 0;
float:right;
overflow:hidden;
/* Blog Header inserted by www.superwebtricks.com */}
See the screenshot here.

Now, click on Save Template to save the all avobe steps in your blog template.
Customization: You may adjust the width of Header-Left and Header-Right section in accordance with the title/logo of your blog or the size of AdSense Ads to be displayed.
You may also specify the width in pixel instead of percentage. Suppose you want to show your blog LOGO (70px) on the left side and insert AdSense codes (728px) on the right side in header section. Replace the CSS codes of header-left width:70px; and header-right width:730px; depending of your blog layout width (800px).
Step-7 (Insert New Gadget):
Navigate the layout section of your blog to see the difference. Here is the screenshot.

Now, you may click on Add a Gadget for adding your Page Header widget in your blog and AdSense Ad Unit codes or any third party HTML/JavaScript codes. Here is the screenshot for your help.

Enjoy!